

It seems like no one has time to read now, and with people skimming your content page instead of reading everything, using anchor links in WordPress can help you keep people on your blog instead of leaving when they see a block of text on-page.
Anchor links are one of those things that you probably have seen bloggers use in WordPress million times, but never knew what they were called.
People don’t often discuss them when it comes to talking about blogging, but they’re an essential part of every WordPress website.
Today you will learn what anchor links are, how to create them, and the pros and cons of Page Jumps and anchor links on your WordPress website.
What is an anchor link?
Anchor links (also known as jump links) are the type of web links that bring users to a specific place on the page. These links allow users to jump to a place in the text that interests them the most without scrolling through the whole page.
They’re usually found at the top of the post or page, or right after the introduction to the post. You can find them in most authority websites, as a table of contents with blue links that get you to a specific part of the post or page when you click on them:

3 easy ways to create anchor links in WordPress
There are three fast ways to create anchor links in WordPress:
Manually adding anchor links to your posts or pages.
Using an anchor link plugin.
Adding anchor links with a Chrome browser extension.
How to manually create anchor links in WordPress
To create a manual anchor link in WordPress, you will simply load the post or page you would like to add the anchor, select the text for the anchor, and create an ID for your page jump.
Step 1: Choose the text and create an anchor link.
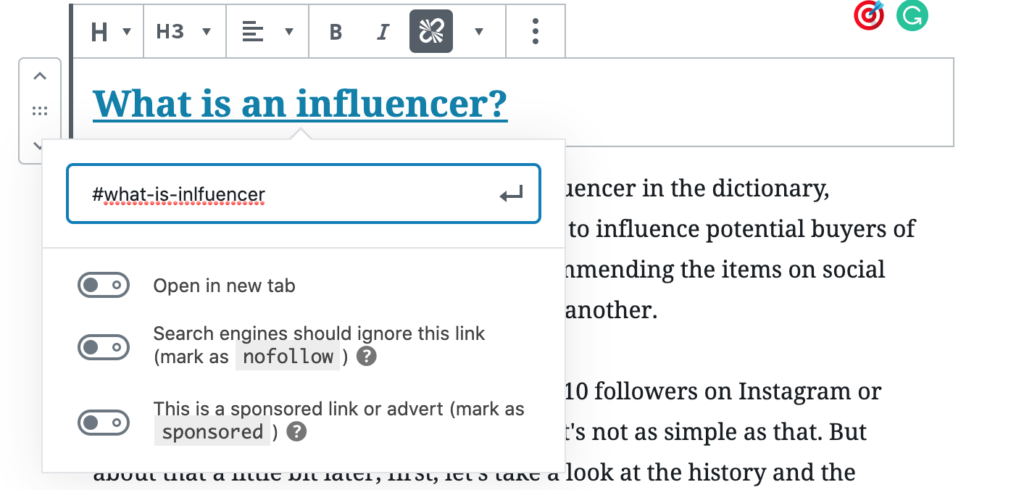
To get started, you need to select the text that you want to link on the page. Then click insert the link button as you would do with any other link URL.
Instead of a regular URL, you’ll type in # and ‘anchor name’ you choose for your anchor link. It can be anything you want, but it’s best to keep it short and related to the thing you’re linking to.
After you type in # and your anchor name, click enter and create a link. Now you can see that the link is created, but it doesn’t link anywhere on the page yet.
That’s because the browser can’t find the anchor link as an ID attribute, which you need to set up next.
Step 2: Add an ID to the linked section on the page.
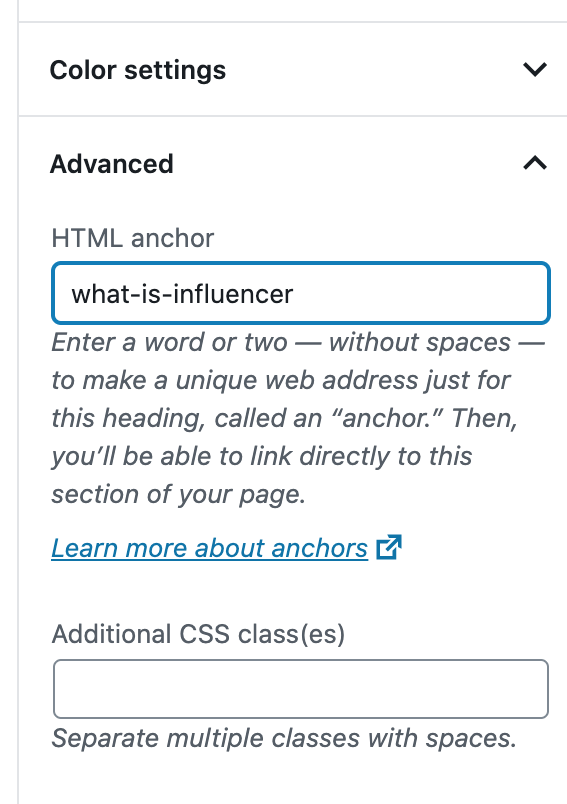
In your editor page, scroll down and find a section you want to link to with your anchor link. It’s best if it’s a heading for a new section or the start of the paragraph on the page.
If the text you want to link is a heading, the easiest way is to click ‘Advanced‘ under the heading section on the right. When you extend this section, you’ll see a field named ‘HTML Anchor.’ In the ‘HTML Anchor‘ field type in the same text as you did for your anchor link. Make sure you don’t add # this time.
You can now save and see your post or page published with an anchor link in place.
If your anchor links to a paragraph and not the heading on your page, you’ll need to do a little bit more work. There is no ‘HTML Anchor‘ field in the Advanced section, and you need to add the HTML code on the page manually.
First, access the HTML editor page by selecting More Options > Edit as HTML. This will allow you to edit the HTML code for the selected block.
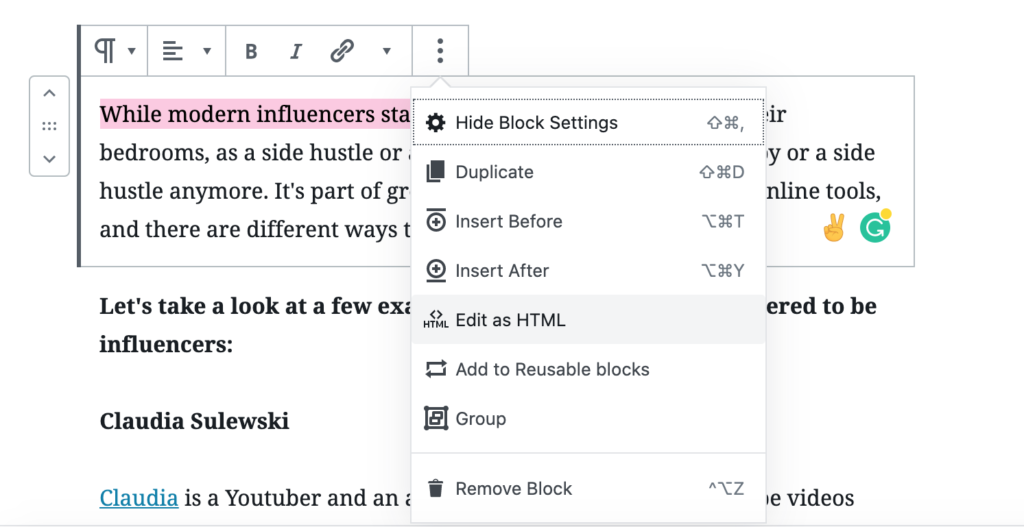
Now, you need to add your anchor link as an ID attribute, just like the following:
<p id="what-is-influencer">
When you add the HTML code, you’ll get the message saying, ‘this block contains unexpected or invalid content.’ You need to click on ‘Convert to HTML,’ and now your anchor link is ready to use.
How to create anchor links in WordPress with a plugin
If you don’t want to mess with HTML code every time you want to add the anchor link, there is an easier way by using free WordPress plugins.
There are plenty of great free plugins that help you set up anchor links on your page easy and fast, but today we’ll be taking a look at Easy Table of Contents plugin.
This plugin is by far the most versatile, and it’s perfect for long-form posts that have 4,000+ words. Easy Table of Contents plugin automatically generates a table of contents with anchor links for you.
You can either fully customize it to suit your needs or allow the plugin to guess where anchor links should be itself.
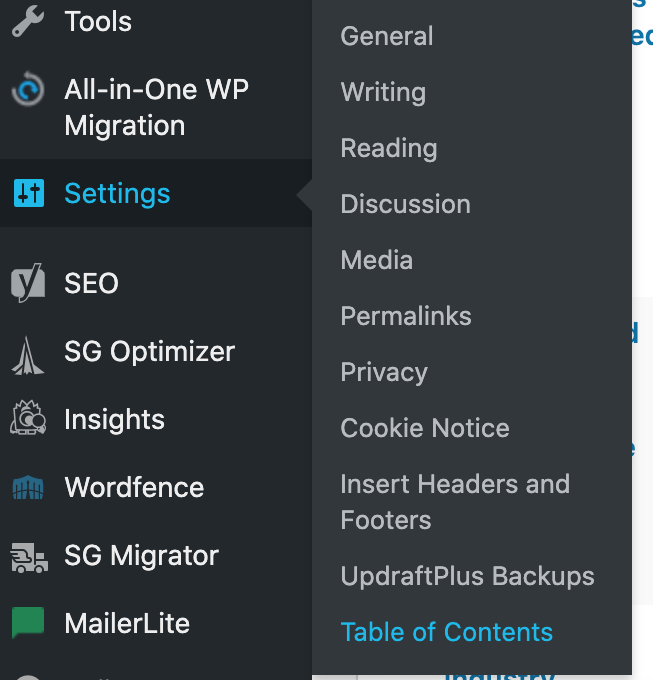
Once you download the plugin and activate it, go to Settings >Table of Contents to configure the plugin.
There you can enable what type of posts you want to add the table of contents.

Also, choose where you want your table of contents to be in the post, and when you want it to be triggered.
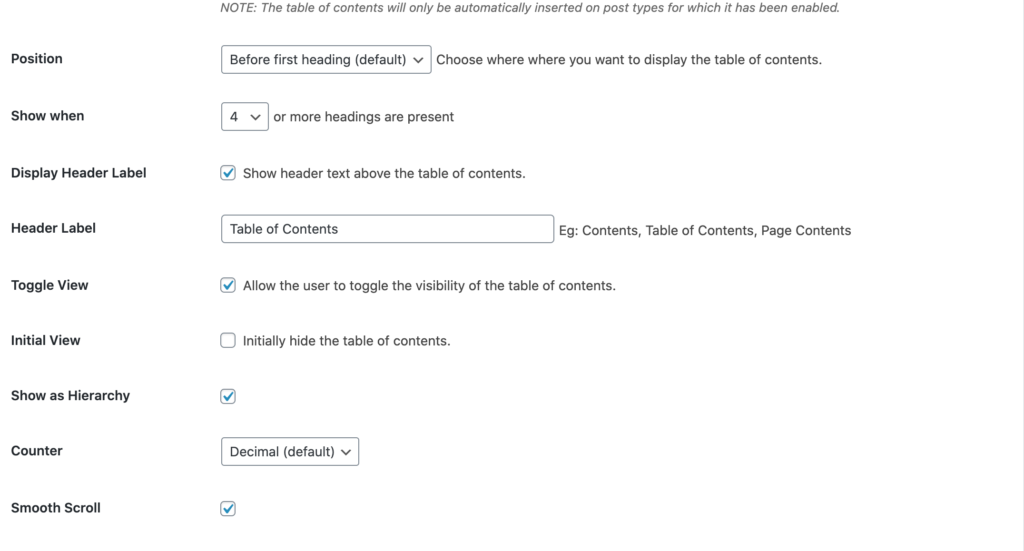
Always click ‘Save Changes‘ before you leave the page so that your configurations don’t disappear.
This plugin will automatically generate a table of contents for all posts you choose. However, if you want to do it yourself manually, you’ll need to do it for specific posts. You can do it by scrolling down in your post editor.
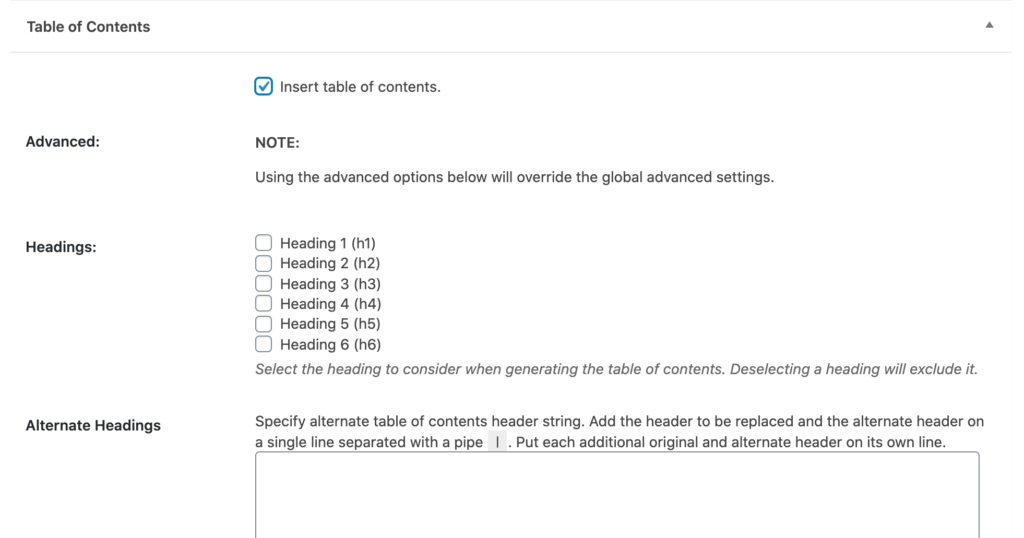
Here you can choose whether to show a table of contents or not and which headings you want to have anchor links. Save your post, and it will have a table of contents ready.
How to create anchor links in WordPress with a Chrome extension
If you don’t feel like using HTML code and the plugin, there is a third option for you. Adding anchor this way it’s by far the easiest and least time-consuming way.
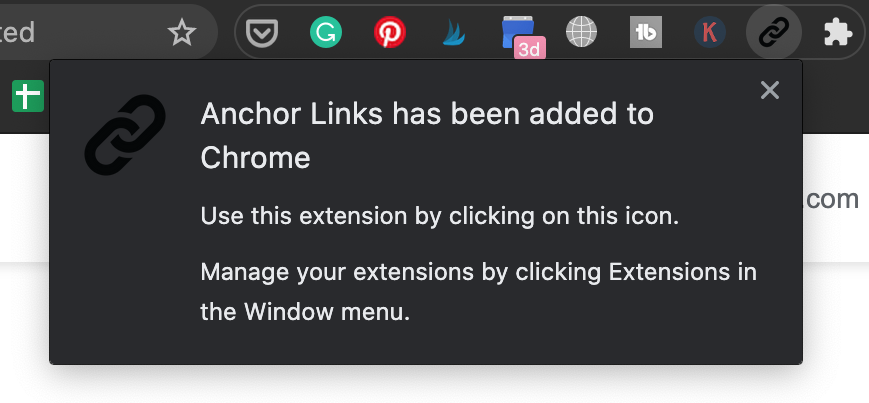
You can create anchor links to your blog post with the help of Anchor Links Chrome Extension which is totally free. It works with self-hosted WordPress, wordpress.com, and medium.com, so you have a lot of flexibility.
Step 1: Install the extension and create your link.
After installation of the extension is done, highlight the header where you want to add your anchor link. After, click the extension icon in your browser.
Step 2: Create a hyperlink.
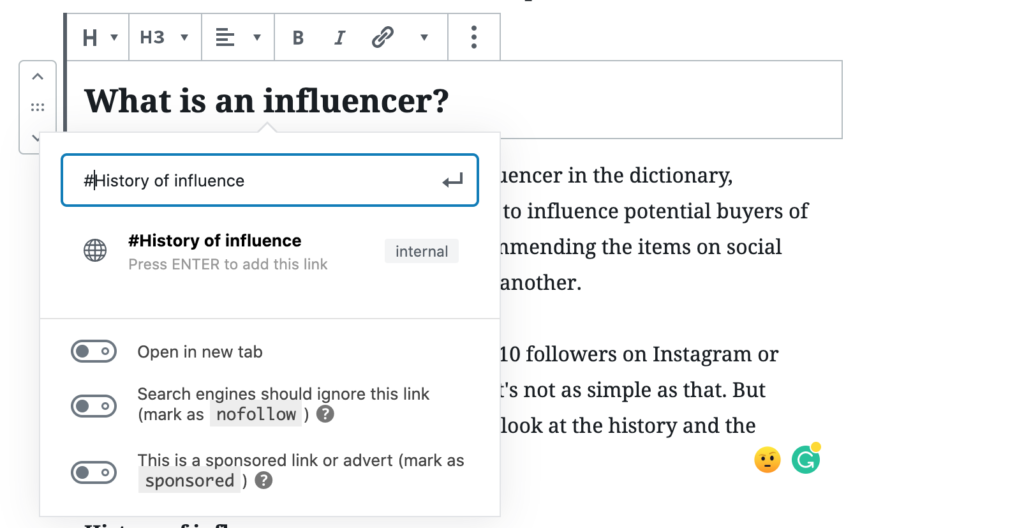
Then, scroll and find a place where you want your anchor link to link to. Highlight the text, add the hyperlink as you usually do, and click ‘Paste.’
And that’s it. Your anchor link is in place and ready to be used.
Things to keep in mind when creating your anchor text in WordPress
There are a few things to know when it comes to choosing your anchor text. It’s important to remember these guidelines for better SEO.
First, anchor text is the visible and clickable text in a hyperlink. In most websites, it’s usually blue and underlined, but can be other colors as well.
Should you use anchor links?
When someone lands on your post or page, you only have a few seconds to make a good impression and give them a reason to stay. Our attention span is lowest it’s ever been (thanks to technology!), only 8 seconds.
People don’t always have the patience to read through long blog posts. Actually, when someone visits your website, you only have 15 seconds to make a good impression so they stay for more.
So if you want to keep them interested for longer and make your content marketing efforts pay off, you need to get creative. Anchor links can help you do that.
Anchor links | Pros and Cons
When it comes to using anchor links, the pros far outweigh the cons because the most important thing is to give the user the best possible experience.
Pros
+ The Biggest advantage of using anchor links in WordPress is creating a better user experience for people. Anchor links allow users to find what they’re looking for fast and efficiently, without scrolling for days.
+ Using anchor link in your post or page can be useful for SEO, as Google sometimes displays anchor links in search as ‘jump to link.’ Also, Google can show several links as ‘jump to links,’ and it can improve your click-through rate in search results and get you more traffic.
Cons
+ Using anchor links can decrease the average time on site per visitor on your WordPress page. It happens because users don’t have to scroll and can jump straight to the content they need. Yes, it can negatively affect your time on page stats, but they’re more engaged because they get value from your post quickly, and that’s a good thing.
+ Another thing is that it messes with your search console analytic tracking. Each ‘jump link’ is displayed as a separate URL, so it can get messy. But as mentioned before, user experience is the most important factor.
So, an SEO-friendly anchor text is:
+ Relevant to the linked page
Search engines pay attention to link relevancy or how related A and B links are if one is linking to the other.
It’s very important that you focus on using text that’s relevant to what you’re linking as it will help the search engine rank you higher.
+ Short and precise
There is no length limit to your hyperlink text, but it’s always best to keep it as short as possible while being as clear as possible.
When creating hyperlink text, always think about what would make people click and what is the most precise and accurate way to describe the thing that you’re linking to.
+ Not overly keyword-heavy
Try to avoid using the same keywords in your hyperlink text often as the search engine algorithm can flag it as suspicious. Keyword stuffing is very bad for SEO, and it doesn’t look natural.
It’s OK to use keywords in your hyperlink text, but it’s best if you use a variety of different keywords.
Conclusion
As you can see, using anchor links in your posts can be a great way to make your blog posts easier to digest. It also gives your readers value they’re looking for fast and efficiently.
And it’s very easy to add jump links to any page. You don’t need expertise in coding or a professional web developer to help you.
There are a few different ways you can add anchor links in your WordPress website, depending on what feels more comfortable to you. Even if you don’t have a lot of time, you can find a solution.
Have you tried using jump links in your blog post or page already? If so, we would love to hear about your experience and opinions.