

Email marketing is still the most effective way to reach your readers, with over half of consumers preferring email over other communication methods like social media, text, and others.
Getting lead capture forms throughout your site is essential.
ConvertKit has simple, painless ways to collect leads on your website and grow your email list.
The best part? You can do it for free!
Let’s get into how to add ConvertKit to WordPress so you can start collecting leads in five powerful ways.
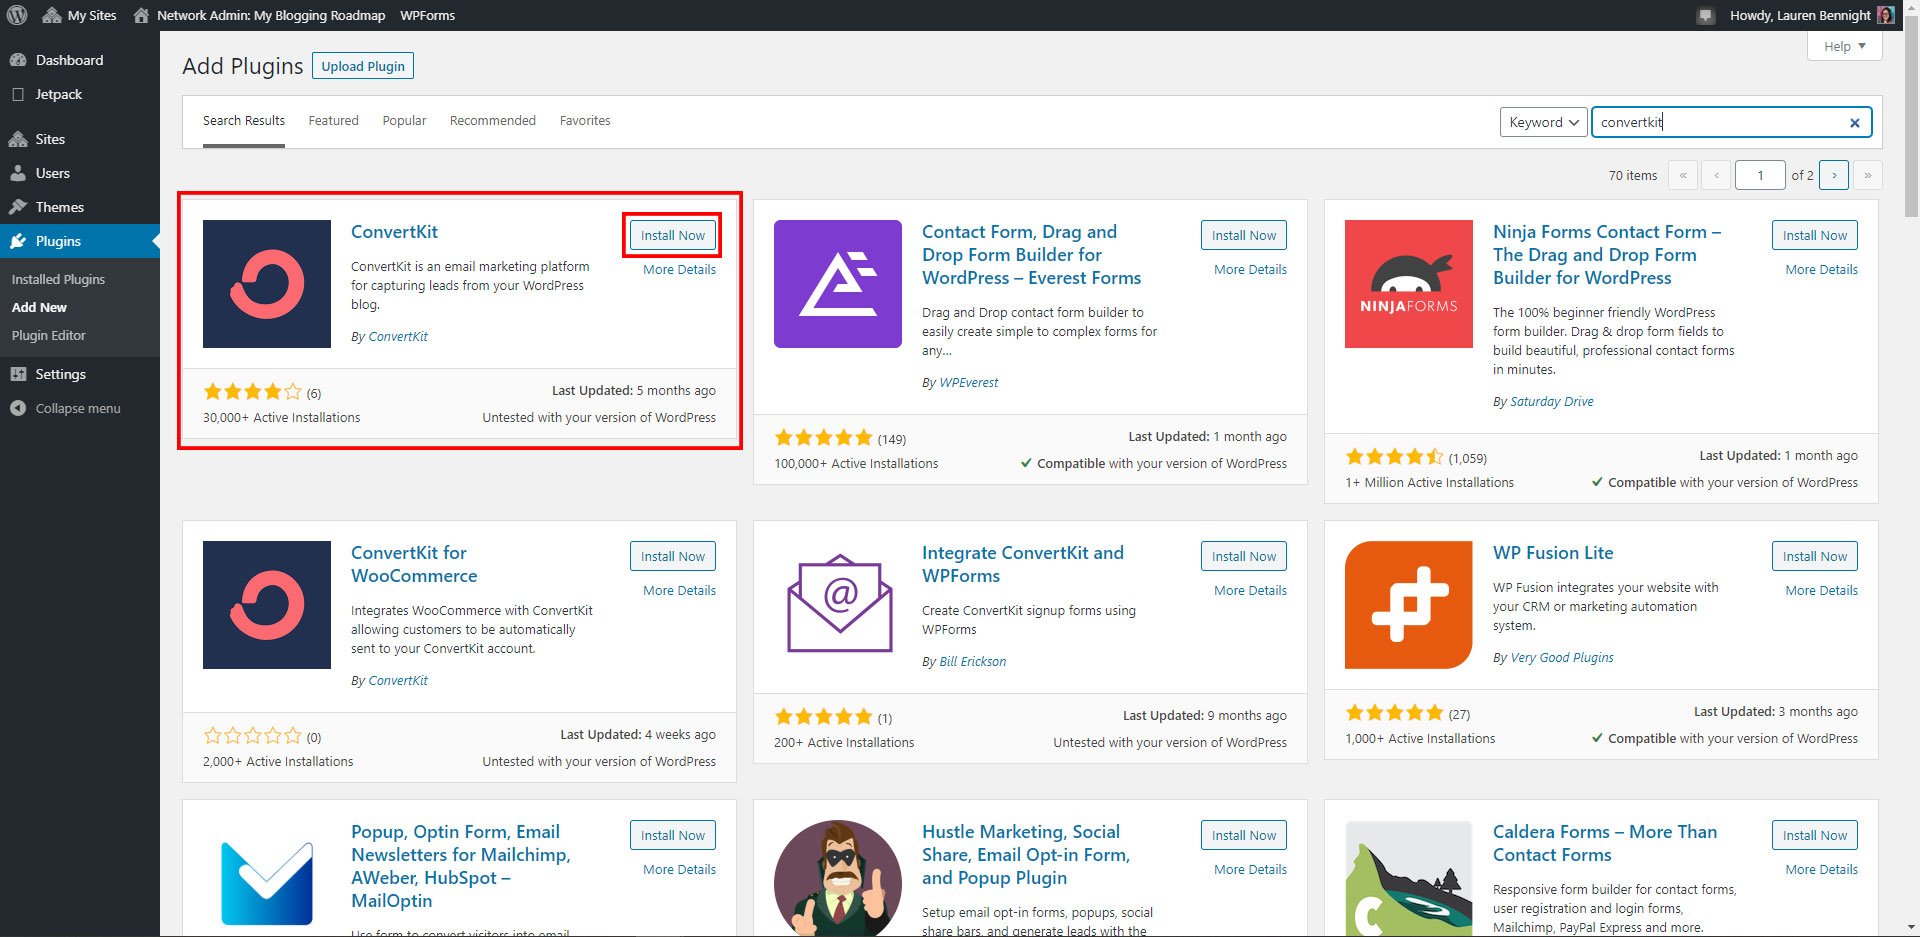
How to Install the ConvertKit WordPress Plugin
To get started, navigate to Plugins > Add New from your WordPress dashboard and search for ConvertKit. Install and activate the plugin. You can also download it straight from the WordPress plugin directory.
Setting Up ConvertKit
Getting ConvertKit forms set up is as simple as installing the plugin, adding your API key to the plugin, and customizing your lead generation forms. You’ll be ready to start collecting leads in no time.
Add Your API Key
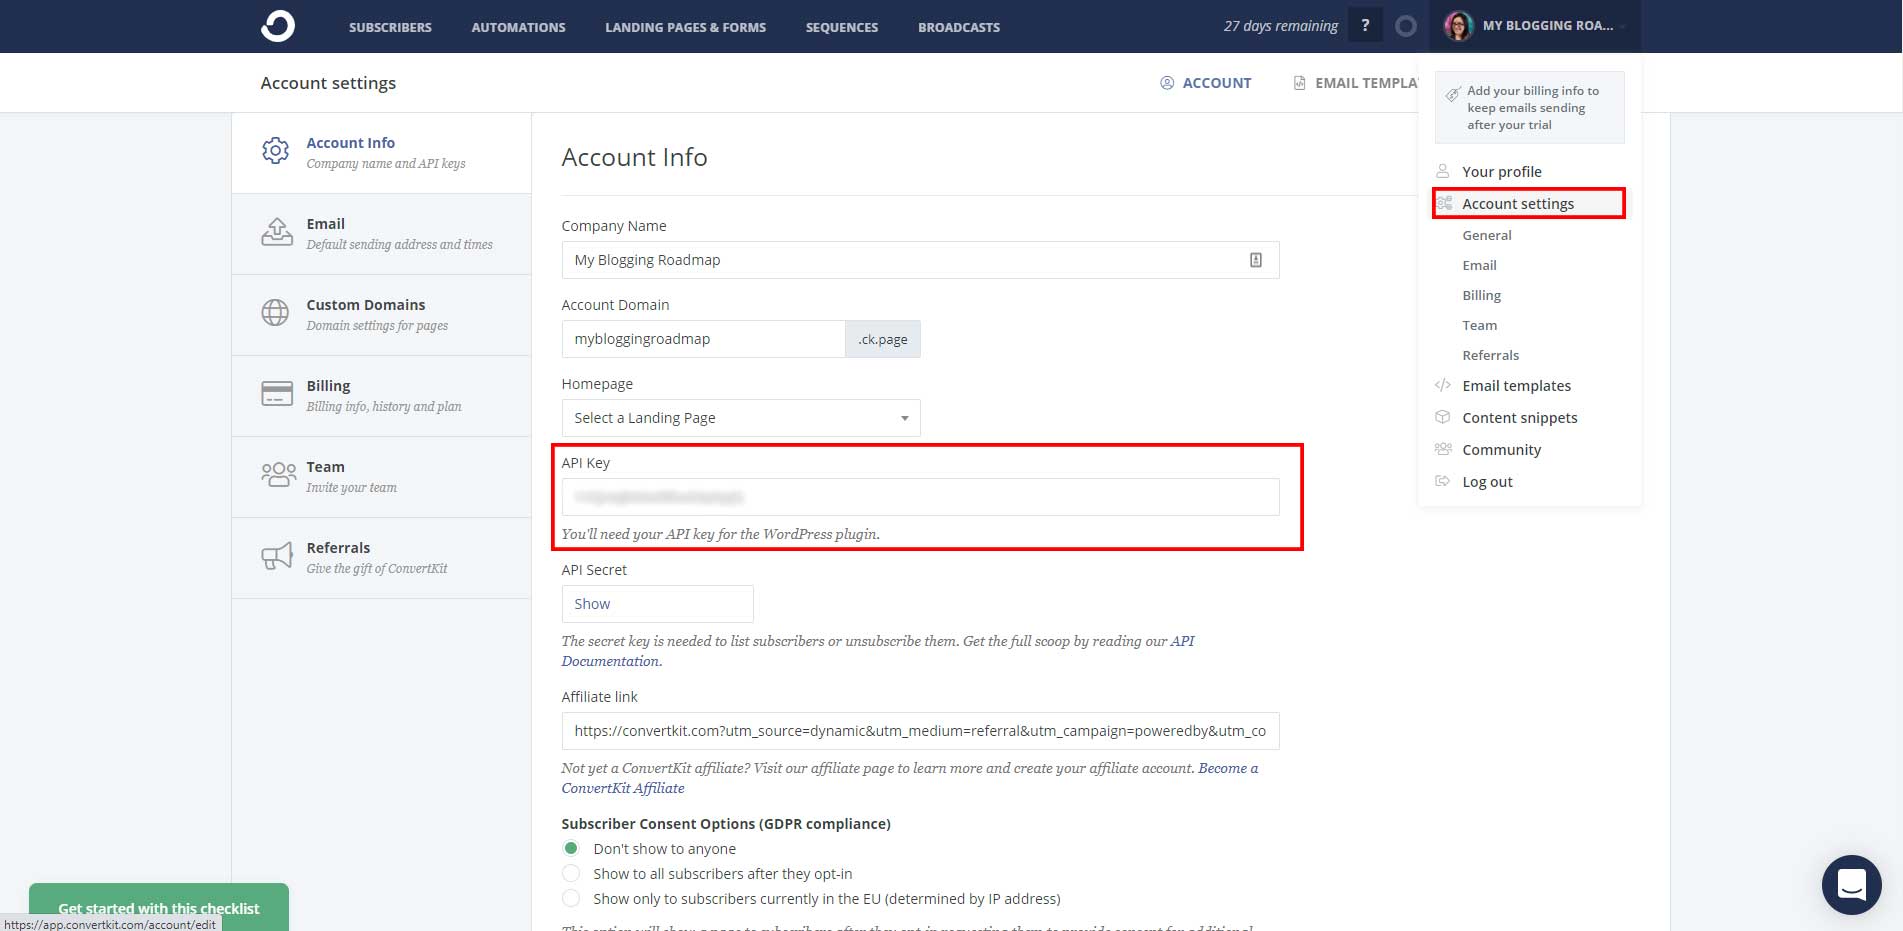
Log into your ConvertKit account, click on your account menu, and go to Account Settings. Under Account Info, copy your API Key. (No need to mess with API Secret—you’ll only need the API Key for lead collection.)
Next, go back to your WordPress Dashboard. Go to Settings > ConvertKit, copy and paste your API key in the corresponding field and click Save Changes.
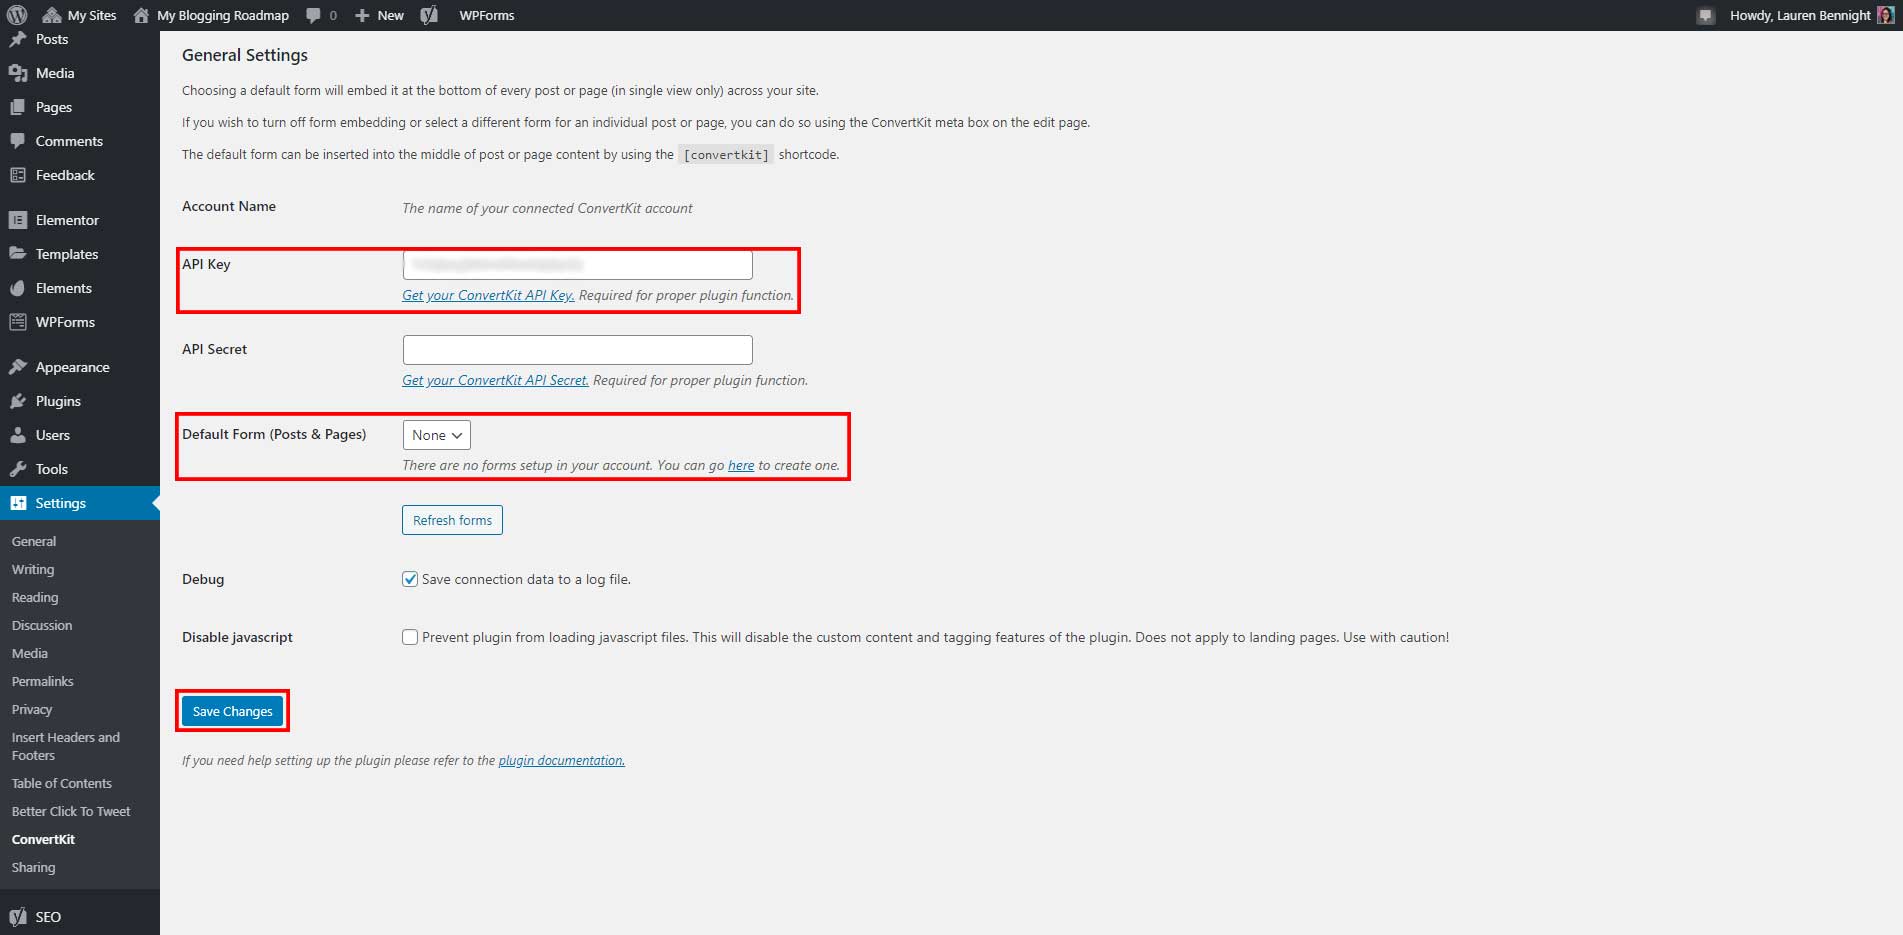
The last thing we’ll want to change is the Default Form, which is a signup form that appears on all your posts and pages.
5-Ways to Get More Leads with ConvertKit on WordPress
- Capture leads with an “in content” form on your blog posts and pages
- Capture leads with a targeted lead magnet per specific post category
- Get leads in your WordPress website sidebars
- Create a compelling ConvertKit website popup
- Build a high converting landing page on ConvertKit for free
Designing Your First Form

Click on the link under Default Form. You can also access this from the Landing Pages & Forms tab from your ConvertKit account—just click Create New.
Click Form when asked how you want to gather subscribers. For your Default Form, we’ll want to select the in-line form.
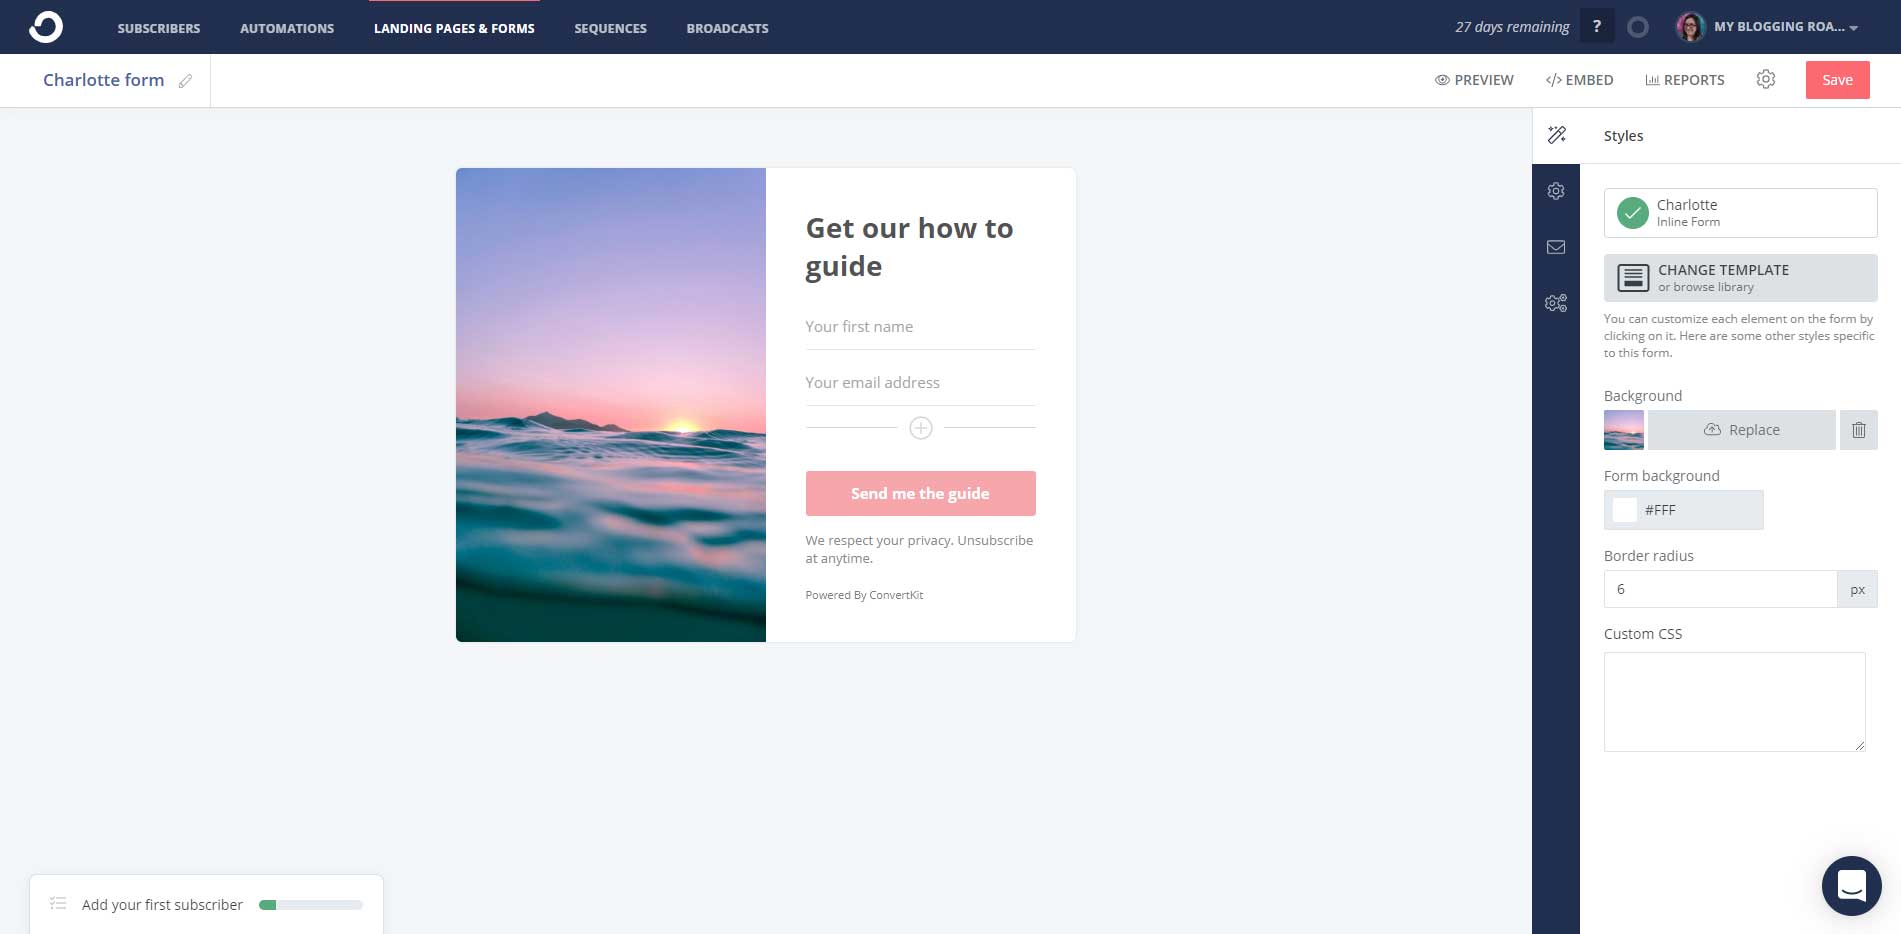
Here, you’ll be able to customize your form’s images and text, set up a landing page, and choose what happens after someone subscribes to your list through this form.
Assign a Form to a Post Category
The ConvertKit Form option overrides your Default Form in the ConvertKit plugin settings. This is useful when you don’t have a lead magnet for a particular post, but have something relevant for that topic.
For example, you could create a form to download photo presets for the photography category in the screenshot below. If you had another category, like social media, you could create a different form and direct your readers to post ideas or a social media calendar.
Go to Posts > Categories and click or Edit the category you want to assign a form to.
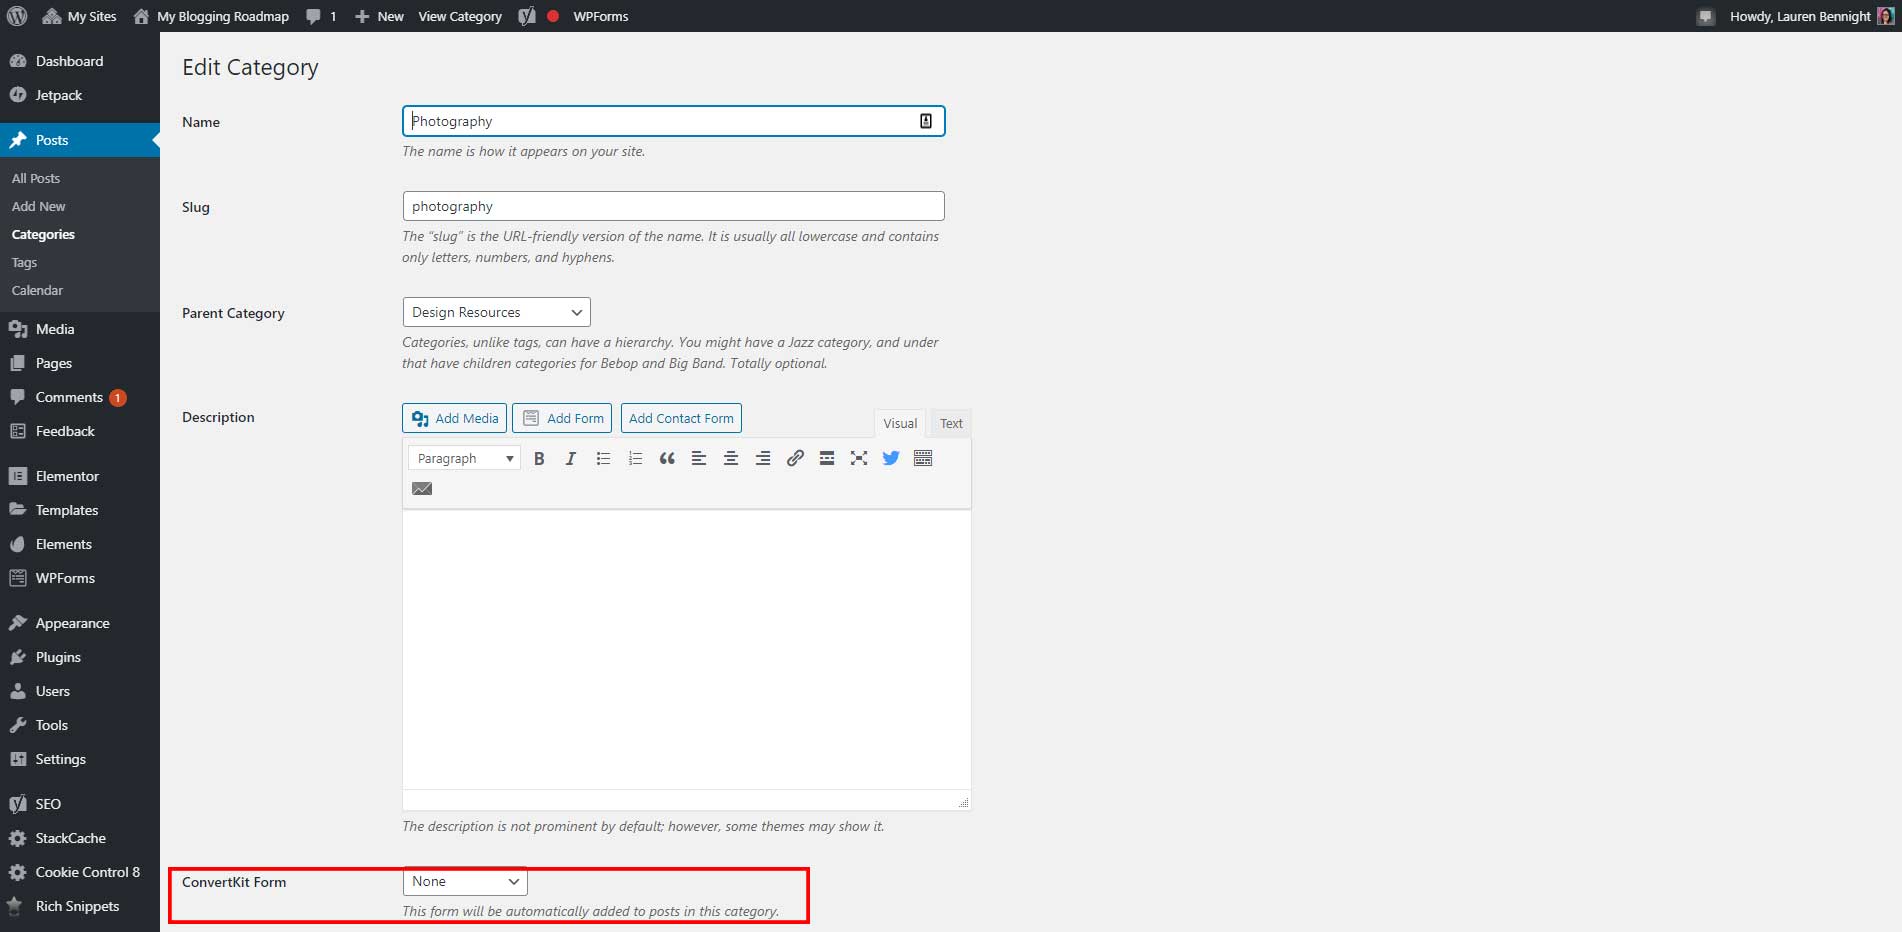
Then, click on the ConvertKit Form dropdown and choose the form you want to use.
Incentive Emails
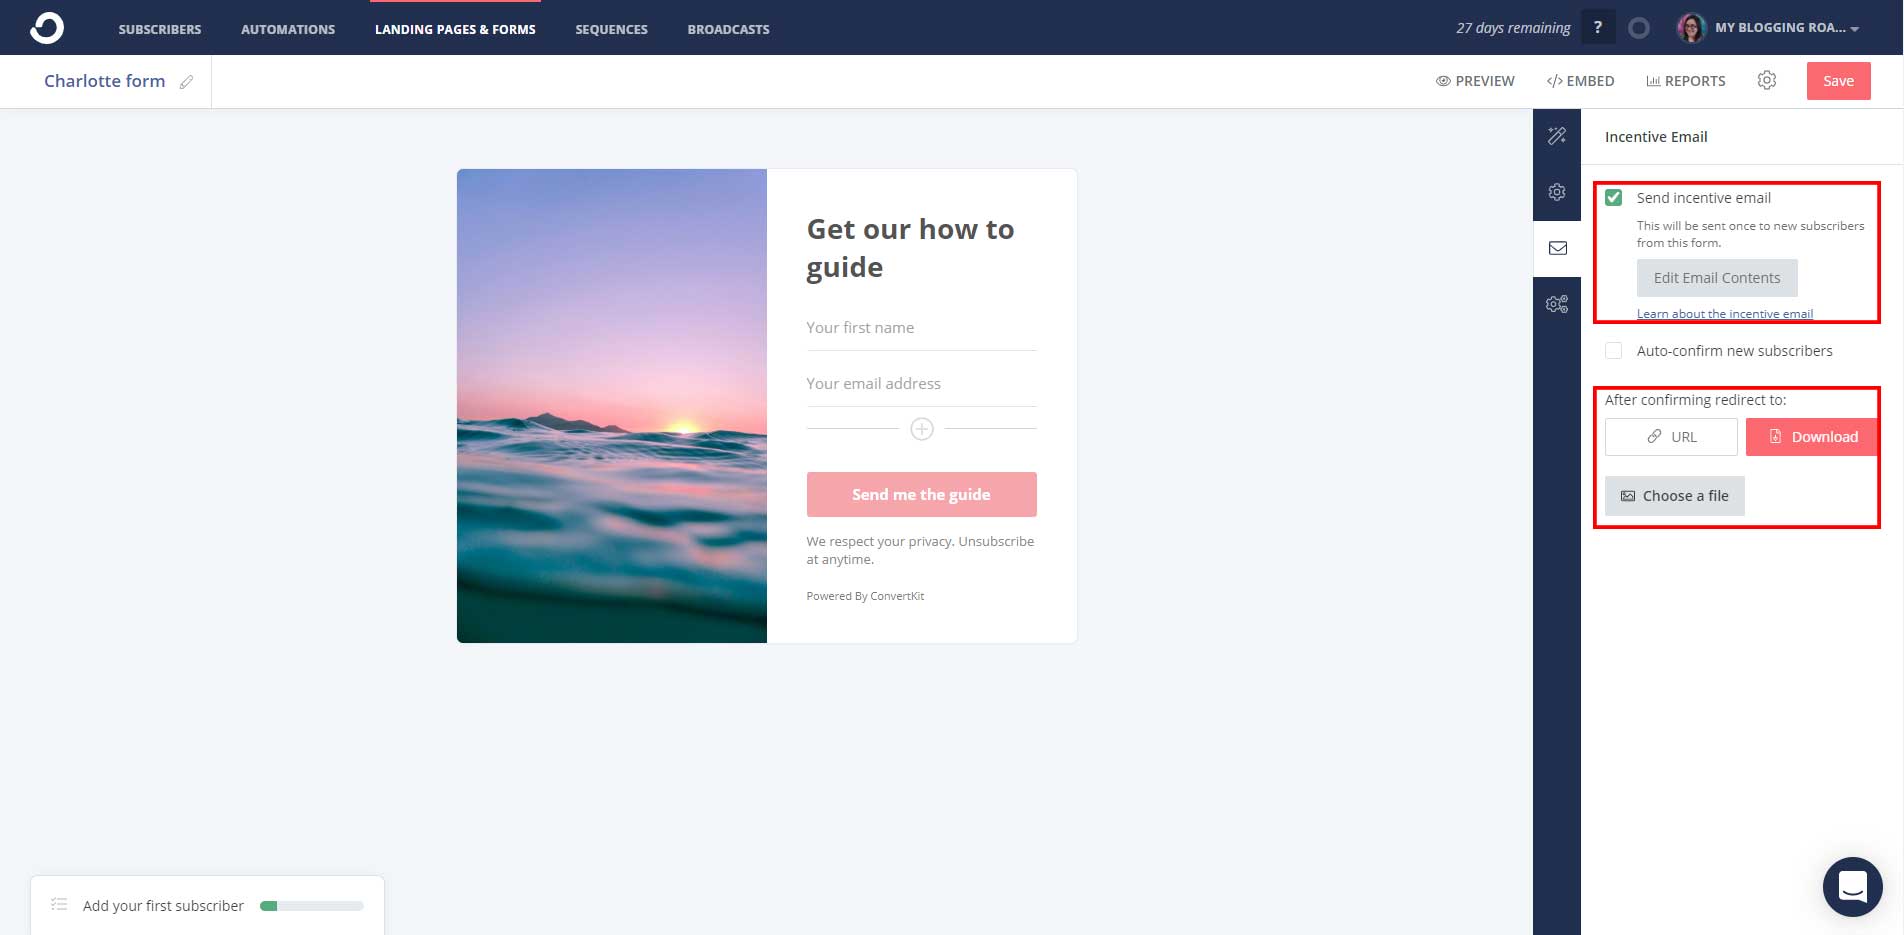
ConvertKit’s incentive emails are one of the features that really set it aside from other email marketing services. It makes it super easy to tie downloads to specific forms.
Incentive emails give you a way to offer unique downloads based on the form your subscribers sign up through. Just check the option to “Send incentive email” and click “Edit Email Contents” to customize the confirmation email.
At the bottom of this section, you have the option to redirect to a URL or a download. If you have multiple downloads or offerings on a landing page already, you can just add that URL here.
Otherwise, upload the file you want subscribers to download.
Lastly, this section gives you the option to “Auto-confirm new subscribers.” While this might sound convenient, stick to the confirmation email in the beginning.
This makes sure your list doesn’t get clogged with incorrect or fake emails, which can lead to wasted subscriber slots and bad delivery rates.
Once you’re done setting up your first form, click Save. Go back to your ConvertKit settings on your WordPress dashboard and click Refresh forms. You should now have the option to add it under Default Form.
Save your changes and give yourself a pat on the back—you’re done with your first lead generation form!
Create Forms for Specific Posts or Pages
Creating opt-ins for specific blog posts is a great way to collect more targeted leads. For instance, if you have a post about how morning routines lead to increased productivity, you could create a printable that helps readers make their own routine.
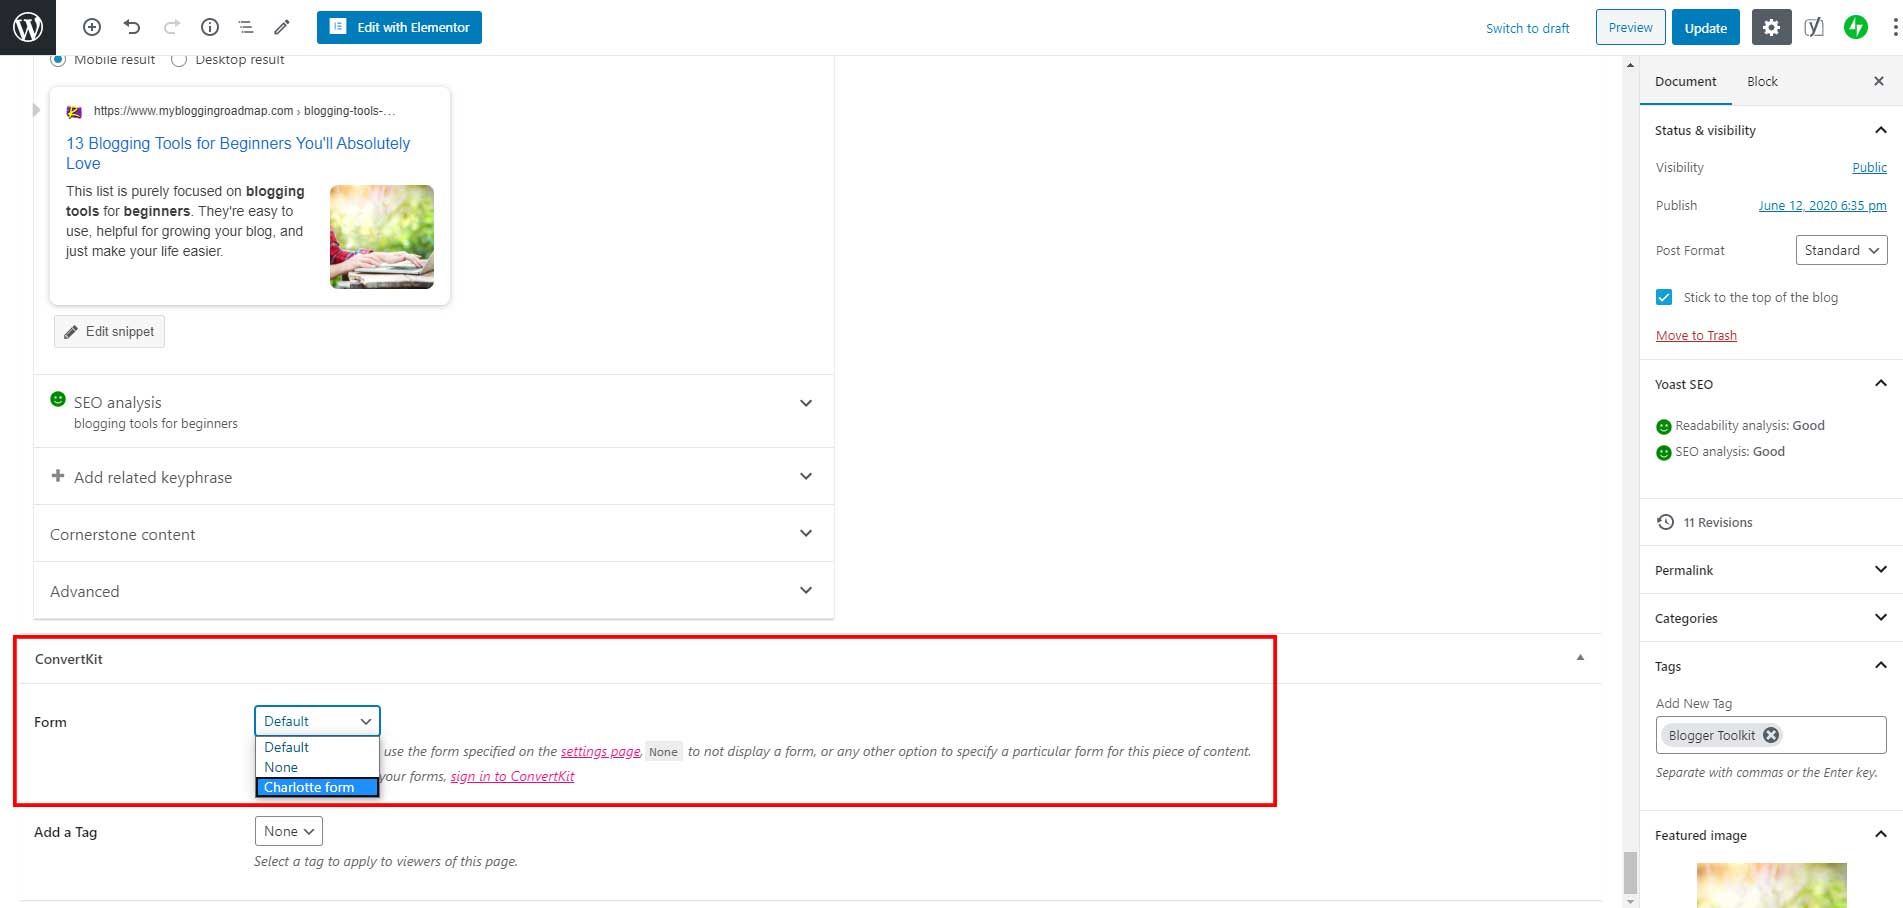
Once you have a form created, click to edit your post and select the form from the Form dropdown below your post.
This setting overrides both the Default Form in your ConvertKit settings and the Category Forms.
Add In-Line Lead Capture Forms
In-line forms offer a convenient way for readers to subscribe before they forget, without being taken away from the post they’re reading.
If you’re writing a blog post or landing page that mentions a download, encourage your readers to take action now.
Not in a few minutes, not once they’ve finished the post, but right then and there.
Offering an in-line form while things are still fresh in their mind is the best way to get them to take action. If done correctly, they’re unintrusive and actually more convenient for your reader.
Add an Optin Form to Widgets
Widgets are an easy way to display your signup forms in the sidebar or footer on your site. Go to Appearance > Widgets and drag the ConverKit Form widget to the widget area you want to display it in. Then, select the form you want to display.
In the beginning, you can just leave this as your default form and change the form later.
Landing Pages & Pop-Ups
Create a Pop-Up Form (Modal)
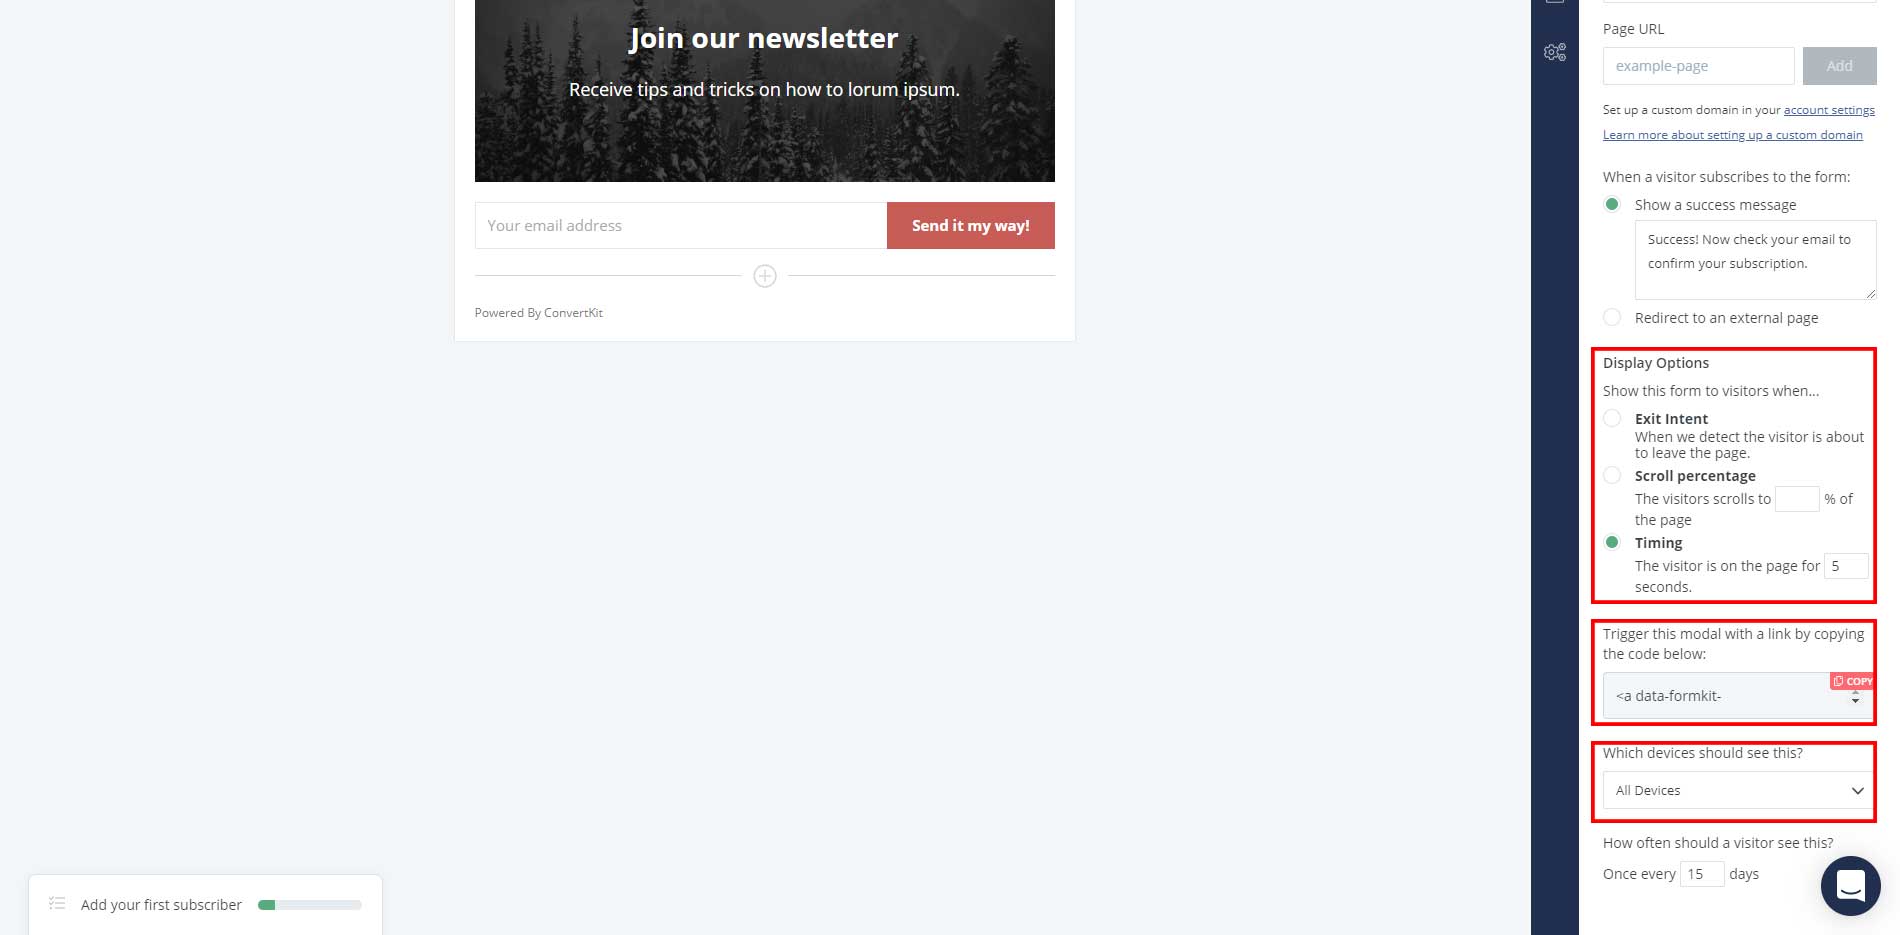
Pop-up forms, or modal forms, are perfect for capturing attention shortly after your readers arrive or as they’re leaving. To create a pop-up form, create a new form and choose the Modal option.
Under the settings tab, you’ll see some new display options—Exit Intent, Scroll Percentage, and Timing. By default, timing is selected for 5 seconds.
Optimizing Modal Forms for Mobile
Google considers certain forms intrusive, especially if they block the content and prevent readers from easily accessing content.
It states that intrusive interstitials (popup/modal forms) lead to a worse experience than pages where content is immediately accessible. In your case, this refers to things like welcome mats (forms that take up a lot of space above the content) and many kinds of popup forms.
If you’re worried this will impact your mobile site performance, read more about what Google considers intrusive.
ConvertKit also offers the option to create desktop- or mobile-only forms. Under settings in the form creator, there’s a dropdown under “Which devices should see this”—just select Desktop if you don’t want a popup to appear on mobile devices.
Landing Pages and Subscription Actions
Landing pages are an all-out approach to promoting your products and services.
Rather than dedicating a section at the end of a blog post or a quick mention of your products in your content, you’re dedicating a whole page to converting your readers to buyers.
Each ConvertKit form has its own landing page in case you want to link to the form on its own. By default, these pages use ConvertKit’s domain, which you can rename under your Account Settings > Account Info.
You also have the option to use your own domain name, but it’s best to use ConvertKit’s domain in the beginning. If you do want to use your own domain, ConvertKit recommends using an entirely separate domain that isn’t being used for website hosting or anything else.
Learn how you can create a high-converting landing page and collect even more free leads.
Next Steps
Once you’re more familiar with creating forms and have an idea of where you want to display them, you’re ready to start collecting leads!
Here are a few things you can do to give readers a reason to sign up for your list:
- Ask your existing social media following to sign up. Let them know what valuable information they’ll get out of it!
- Write a blog post announcing your new list. Talk about what kind of content they (subscribers only!) can expect to see.
- Create a download for each of your major categories and set up a form for each.
- If you’re stuck on what to write to your new leads, start with a story. It could be what inspired you to start your business, a recent success story from a client, or something to inspire them.
- Once you start getting signups, ask your readers what kinds of incentives or content they’d like to see. Sometimes a direct approach is the best way to get ideas.
The most important part is to reach out to them in the best way you can. Connect with your readers and let them get to know you more.