
Why should you create an online course?
Because the profits are EXTRAORDINARY.
But it’s not all sunshine and daisies …
Anyone who tells you that creating courses and making money online is “easy” is full of it.
The reality?
It’s a lot of work.
Fortunately, there is a tried and true method that works every time!
This method requires five difficult (but worthwhile) steps …
Today you will learn the tried and true process to create an online course that sells.
And guess how much you’ll have to pay for it?
Zilch. Zero. Nada.
So, can you create a course for free that makes money?
Yes, you can create an online course for free!
AND
Start making money right away!
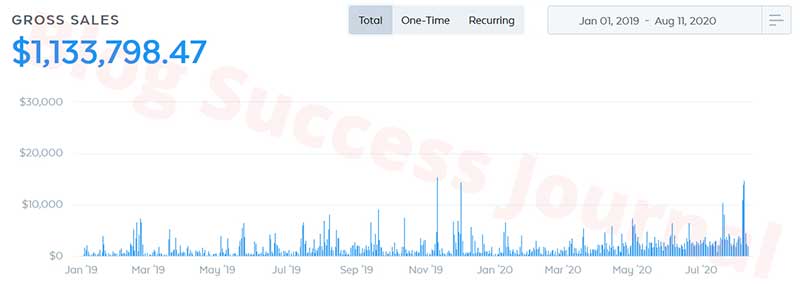
In fact, using this exact course creation template helped me go from inconsistent paychecks to breaking the 10k a month mark and crossing into the million-dollar online business!
Look:
Here is the proven process that you will be able to set up today!
- Outline Your Course Idea
- Make Your Course Sales Plan
- Begin Driving Traffic
- Create Your Flagship Content
- Start SELLING YOUR COURSE!
Ready?
Let’s dive in.
Step 1: Define Your Course Outline
You already know what an outline is. You learned it way back in high school when you were writing a bunch of research papers …
But there’s actually a much better way to create an outline for your course …
And this will benefit you in several ways.
Check this out:
Instead of creating a traditional outline …
You’re going to create 27 “How To” mini-lessons.
Why 27?
Because it’s a magic number! For two reasons:
First of all, it’s the number of steps needed to create an epic flagship course.
An epic flagship course follows a 3 x 3 x 3 matrix.
This means that there will be three main phases in your course, and each of these phases will have 3 modules, and each of these modules will have 3 lessons.
What does this add up to?
You know it … 27 total lessons.
The second reason this number is “magic” is that it signals you’re over 1/4 of the way to becoming a real Internet marketer.
How does this work?
Basically, once you’ve got 100 posts on the Internet, you’ve accomplished a huge step.
This 100-post milestone is an epic marker to pass on the way to becoming a trusted advisor and beginning to sell effortlessly online.
Wait, but does that mean you can’t make money before you cross 100 posts?
Nope!
It’s actually the opposite.
You can start to make money as early as today, and these 27 “How To” ideas will help you get there faster.
So, what do you need to do?
Decide on Your Course Topic
It could be anything. Like “How To Have Epic Family Time” or “How To Pay Off Debt in 30 Days” …
Here’s an example:
Course Name – “Serve Breakfast Like a King”
The three phases could be …
- Shopping
- Cooking
- Serving
And, of course, each of these different phases require smaller steps.
Shopping, for example, would need:
- Preparing your list
- Choosing kingly meats
- Choosing the best veggies and spices
Each of these modules would have three to four lessons discussing the various steps:
- List preparation steps
- Meat shopping steps
- Veggie and spices shopping steps
And there you have it ….
3 x 3 x 3
Of course, you don’t have to follow this exactly.
You can increase the number of phases, modules, or lessons based on the most effective way to convey your knowledge and experience to your community.
If you can only create your first three or four steps right now, that’s okay.
The next few steps in this post will help you to flesh it out more.
Step 2: Plan Your Course Sales
First, determine the types of media you plan to use for your course.
Most online courses are created with video.
Video is awesome because it gives you the power to easily communicate using the most direct method possible.
But you actually have all kinds of tools at your disposal for your lead magnet.
Here are a few examples of the types of media you can use:
- Videos
- Quizzes
- Multimedia
- Text
- Surveys
- PDFs
- Audio
- Downloads
- Presentations
- Exams
- Assignments
Decide what types of content you will be using.
One other important thing that we want to warn you about is your recording equipment …
You absolutely need to invest in a high-quality microphone and camera if your course is to stand out and look professional.
To record on a computer easily (and for free) with Zoom …
We suggest the Samson Go Mic and the Logitech C920 Hd Pro Camera!
To use your phone, depending on whether you have iOS or Android, here are the best two affordable options:
⅛ Lavalier for Android
USB-C for Android
iPad or iPhone best mic
Now for the fun part!
It’s time to start creating and publishing your material …
How to Make Information Products for Free
Before you can create and sell your course, you need the right platform to “host” your videos and eBooks for your lead magnet and courses.
What’s a lead magnet?
There’s a hard reality most online marketing gurus won’t tell you:
The majority of people only buy after knowing about your product (or business) for at least 90 days.
Only a tiny minority will convert after they see your offer for the first time – you’re looking at anywhere between 1% and 5%.
But how do you sell to the other 95%?
You funnel traffic and establish a relationship built on trust.
How?
Use email marketing and a lead magnet.
It can be as simple as a PDF that gives your audience some valuable information for free in exchange for their email address. You’ll then follow this teaser up with much more in-depth training in your online course.
Let’s use a straightforward example to illustrate the process:
Say you’re working on creating an online course for beginner portrait photographers …
So, you’re diligently preparing your course outline and 27 mini lessons.
As you work through your plan, you pull out some of the most catchy and engaging information from your tutorials …
Stuff that will leave the reader wanting to know more!
You then create a short PDF eBook or make a handful of videos to give away and use as a hook for your audience.
This is your lead magnet!
Here are the two things you’ll need to pull this critical step off:
- An email marketing system
- A platform to “host” your lead magnet
The cool thing is that, for beginners in this day and age, you can create both of these for free!
Relationship Marketing With Email
Once you’ve got a lead magnet, you’ll be able to offer it for free on your blog and website in exchange for a visitor’s email address.
You could even use it in an advertising campaign on Facebook!
If you’ve done your research well, people will be intrigued and decide to download it and sign up for your mailing list.
Pay attention, here comes the critical part, the make-it-or-break-it moment:
You need to deliver value straight to your audience’s inboxes as often as possible (ideally daily).
This is how you become a trusted advisor and unlock your information products’ immense profit potential.
It’s such an important topic that it deserves its own article, so that’s precisely what we’ve done:
Find out how to use the best email marketing strategy to transform your online business!
Pro tip: Use AWeber to sort all your email marketing tech needs.
It’s an unbelievable platform!
Thinkific for Hosting Online Courses
And the best platform to host lead magnets and courses is Thinkific.
Why?
It’s the only course platform that will let you create and sell not just one, but three courses for free.
You can’t beat that!
With Thinkific for 100% free, you can host one or two lead magnets and a flagship course, or one lead magnet and two courses for free!
It’s an awesome online course creation AND selling tool that gives you the power to:
- Create customizable online courses and other information products
- Build sales pages
- Connect to PayPal and Stripe to accept payments with ease
- And sell your courses to your audience
- Without costing you anything
Step One: Go to Thinkific by clicking here.
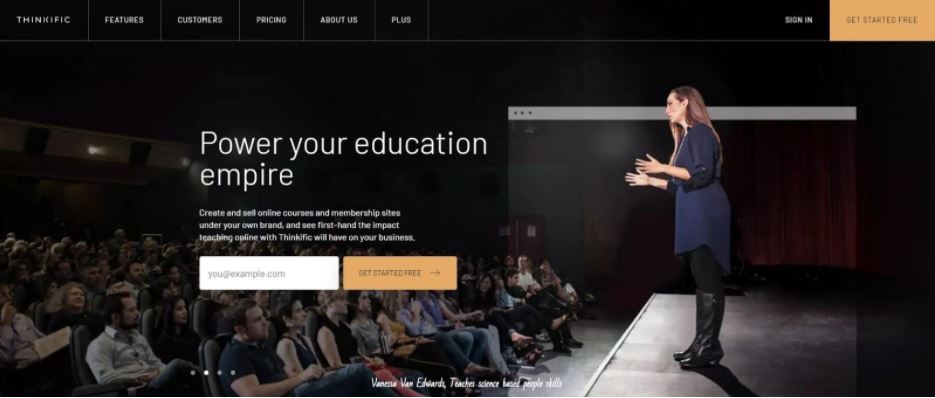
Step Two: Click on the Get Started Free button located at the top right-hand corner of the page.
Once you enter your name and email details, click Create Your Account at the bottom of the screen.
Next, you will need to tell Thinkific about yourself:
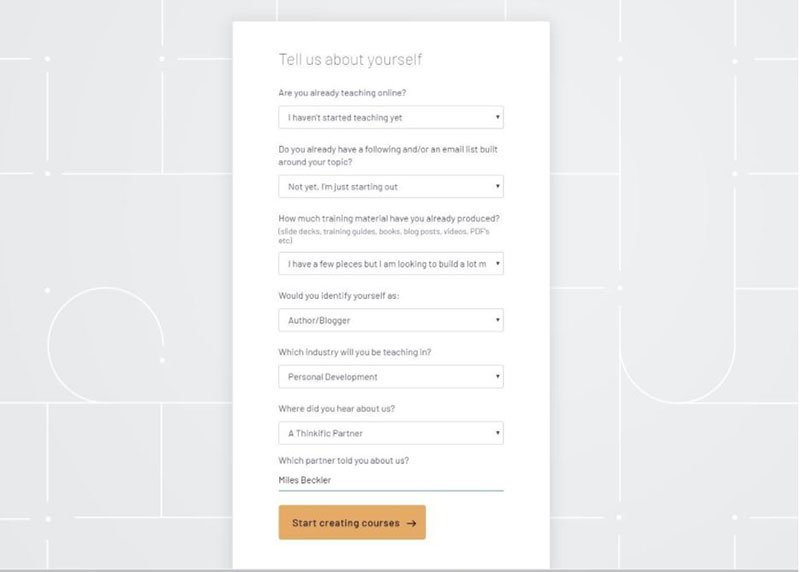
Fill out the required fields when you arrive at this screen, and then move on …
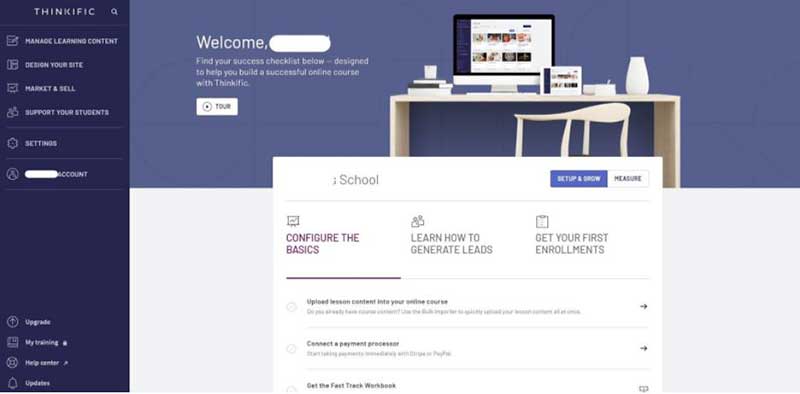
This will bring you to the main dashboard.
Like this:
Choose a Course Template
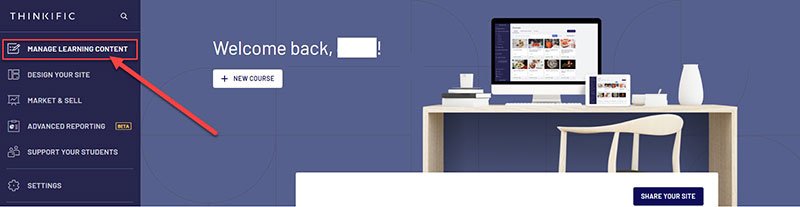
To get started creating your course, click on Manage Learning Content, located at the top of the menu on the left side of the Thinkific screen.
After that, click on the Courses button.
This will open up your Courses Dashboard.
Start by clicking on the + New Course button located at the top right corner of the screen.
Next, you will be asked to choose a course template.
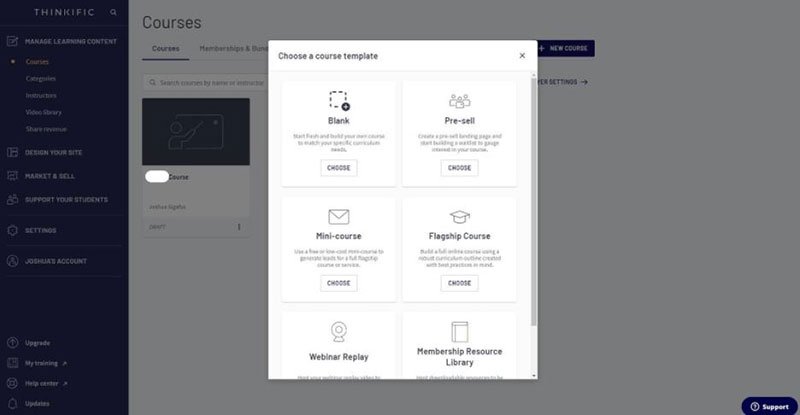
There are several to choose from, but for this tutorial we’re going to use the Flagship option.
Why?
It’s the most adaptable … very easy to work with.
Choose a catchy, relevant, easy-to-understand name for your course that your community will love.
How to [Get Desired Result] in [Timeframe] is a good framework to use for courses.
Then, you will find yourself inside the course builder.
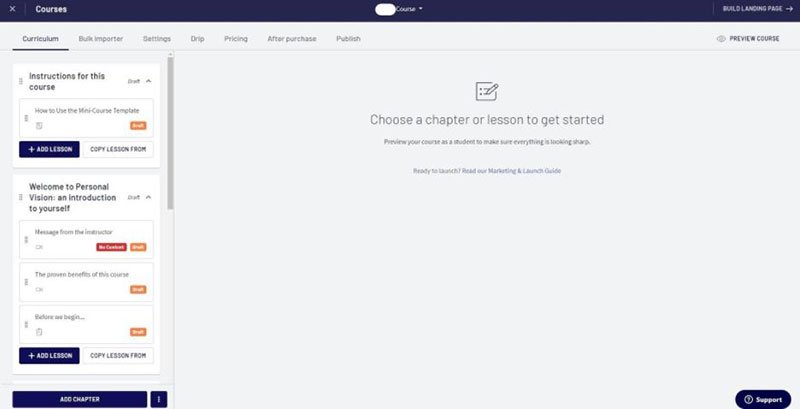
Now the amazing part that is going to really make this process take off:
You don’t need to create the entire course before you put it up for sale!
Surprised?
Don’t be …
Everything in successful marketing is a best guess.
You are not 100% sure that your course is even going to sell!
But trust me …
This is the way successful course creators do it!
How can you sell a course that isn’t finished?
Here’s how:
When you have your first phase completed, this will put you a week or two ahead of your students.
When you begin making sales, all you need to do is stay one week ahead of your students …
Simply add three to four more lessons to your course each week until you finish all the lessons in your course.
This is the way the pros do it!
One of the worst mistakes to make is to spend weeks creating a course you think is awesome …
And then you find that it never sells.
Test-drive your course with an outline by only creating the first 3 lessons. This gets you selling your course now instead of later.
And here’s how to do it.
Start Creating and Uploading Your First Module Content
Click on the + Add Lesson button on any one of the course modules.
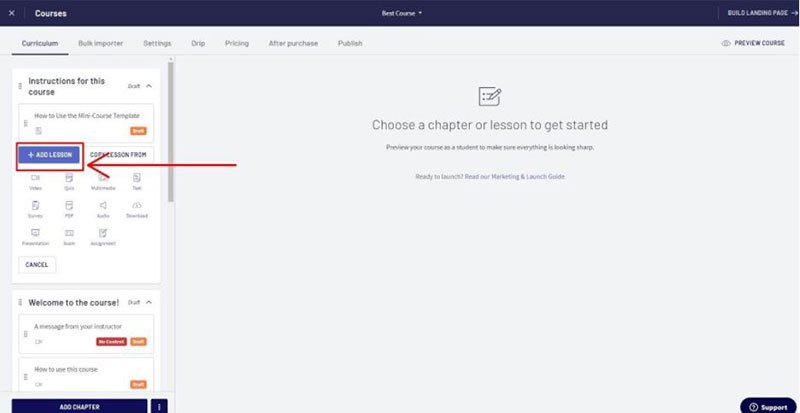
It will bring up a menu.
There, select the type of media you wish to include, then create a section for that content.
Add a lesson to the proper module based on the type of content you want to create.
Next, upload your content to the course using the tools available within that lesson.
Here is what it looks like when you create a video lesson:

Now, just continue to follow your outline as you upload the content you’ll need for the first three lessons of your course.
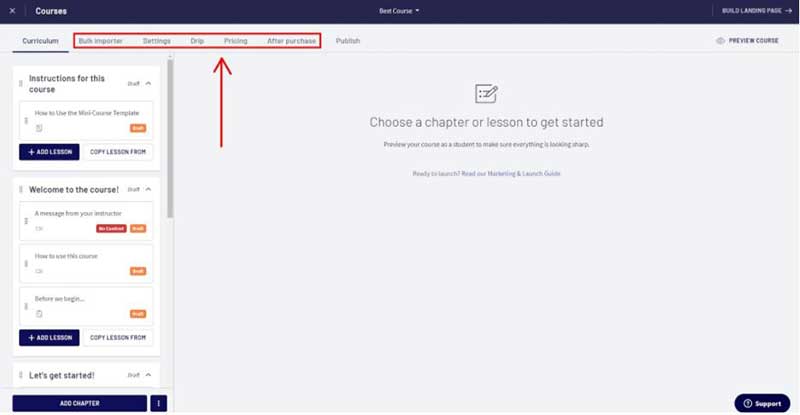
Note: The “Bulk Importer” is a handy tool here …
You can upload all of your course’s video, audio, and PDF lessons with a simple drag and drop!
You can also quickly edit all of your lesson and chapter names as well as rearrange the order they are displayed in your course.
Pricing
Here, you can set what it will cost for students to enroll in your online education and training.
By default, your course will be marked as Free.
Which is what you want—a free mini course or eBook is a great tool to use as a lead magnet.
(You’ll be working on the online “flagship course” in step four below.)
First, however, you want to drive traffic toward your lead magnet …
Step 3: Get the Right Traffic
Okay, so this “step” actually requires two substeps:
- Gain recognition and get traffic
- Connect your traffic to your lead capture system
These are the three best ways to complete substep one:
Blog to Your Niche
Get online and create a blog specifically for your target audience.
Say you’ve decided to create an information product on “how to wallpaper.”
This means you want to focus on people that enjoy DIY or have recently moved houses, so make that the focus of your blog!
We suggest you achieve this by combining the release of your 27 tutorials with other more generic helpful posts about your topic – stuff like “2020 Wallpaper Trends” and “Our Favorite Wallpaper Brands.”
This approach is cheap and reliable …
And it’s an excellent long-term business investment (if you get your keyword research and SEO right).
Secondly, start working on your 27 “How To” mini-lessons.
How can releasing your tutorials one by one make you money?
Well, the odds are that the majority of these “How To” guides will require the use of tools, products, and/or services.
Without them, your reader won’t be able to accomplish their goal.
This means that each “How To” can potentially include an affiliate link for each product or service you mention.
What’s an affiliate link?
An affiliate link is simply a link to Amazon (or another e-commerce platform or website) where your readers can quickly buy whatever you’ve just recommended.
And when they buy after clicking your link, you’ll earn a small commission on that sale.
Another bonus of making money from these posts is that those who find your “How To” article by Google searching are precisely the right type of people you should be targeting.
You know … the ones that will buy your full course in the future.
Need some more input on this step?
Follow this ultimate guide that’ll show you exactly how to start a blog successfully.
So, what’s next?
Here’s how to maximize the amount of money you can make with this strategy:
Spread the Word with the Right Social Media Plan
Social media could be a massive waste of resources and energy if you choose the wrong path.
What do we recommend?
Use Pinterest and YouTube exclusively.
Ignore Facebook, Instagram, and Twitter – your content will disappear in less than four hours, and no one will see it again.
Both Pinterest and YouTube combine the power of search with the engagement of social to solve this issue!
This means people will be able to find your content whenever they search for it. They’ll also be able to save it (or pin it) and come back to it later – perfect for “How To” posts.
Just don’t share too much value for free all at once, or else your viewers won’t be tempted to buy your course!
Give Yourself a Boost: Advertise on Facebook & YouTube
Can you afford to invest a little in your new information product business?
If so …
Try Facebook and YouTube Ads for an inexpensive, short-term way to boost traffic!
There’s too much to say about advertising in one post …
So, rather than getting lost in the details, you can study this fantastic guide.
Once you’ve completed these three tactics, traffic should be flowing to your site!
On to the next step:
Step 4: Create Your Flagship Course
Now that you’ve collected an active audience that depends on your every word for advice, tips, and “How To” guides …
You’re in the perfect position to create your online video course!
Just head back to Thinkific and use the same tools you used to create a lead magnet to put together your video course.
The good news is that, by now, you already have all 27 tutorials written and published.
It will be easy to turn your outline into a full-blown course. Just remember to:
- Incorporate any feedback you’ve received on the individual lessons
- Follow the logic of the 3 x 3 x 3 matrix
- Put your heart and soul into it – people will notice when you’re passionate about helping others!
How To Price Your Online Course
If you want to launch courses and succeed at marketing them, then you need to treat selling courses as the business that it is!
And if you’re like the majority of the online trainers out there, pricing your e-course isn’t something that comes naturally to you.
In fact, it’s one of the most difficult decisions to make.
Pricing has a direct influence on nearly every part of your online marketing or coaching business …
From the kind of promotion you do to market your e-course …
To the kind of learners your course draws in.
It also affects the amount of support and personal time you can offer to your learners.
Charging too little?
You can lose your course’s perceived value, restricting your income potential and promotion capabilities in the process.
Charging too much?
You can scare customers away, which means you’ll have to decrease your price to grab some sales.
Thinkific suggests not to sell your online course for less than $50.
In fact, they recommend pricing your course for $199 or more.
But the decision will be up to you.
Just like your course is a test made on the best “guess” you have, your pricing works similarly.
Experiment and adjust based on the data you gain, until you find the ideal balance between the right price to encourage sales and making sure you pay yourself for your time.
Note:
If you don’t make sales at all, the first place to look (and work on) is the messaging in your sales page, not your price!
In the next step, we’ll cover creating a killer sales page …
Moving right on …
Once your course is recorded, edited, reviewed, perfected, and finalized, it’s finally time for the final step …
Step 5: Launch Your Course
Oh no, I’m going to need to learn how to code …
Stop right there!
Thinkific has got you covered (again)! 😀
It’s not only great for creating, editing, and hosting your online courses … but you can also use it to quickly and easily set up:
- A website
- Landing pages
- Shopping cart and checkout pages
- Payment processing
All still for 100% free?
YES!
What a program!
What more could you want?
We can only think of one more thing …
Build A Free Sales Page
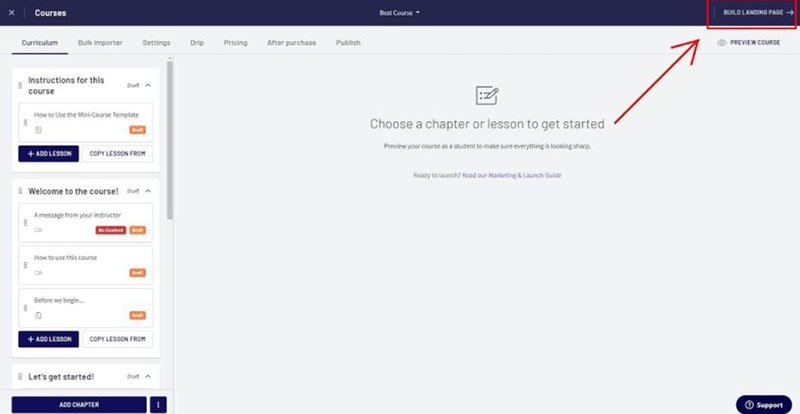
With your outline and 3 lessons uploaded, it’s time to create the sales page that will jumpstart your online course.
Head back over to the Thinkific Dashboard.
Click on Manage Learning Content at the top-left corner of the screen.
Then click on Courses:

Step One:
From the list of courses you have created, select the course for which you want to build a landing page.
Step Two:
Click on the Build Landing Page button located at the top-right hand corner of the screen.
Next, the default setting for your Landing Page will load:
Step Three:
Using the customization settings provided at the left-hand side of the screen, customize your landing page to your liking.
Click on Theme Settings.
Then choose Styles, Colors, and Typography.
Your sales page for your course needs to include these elements,
- Headline – Clear and compelling words that convey what’s in it for them.
- Copy – Words that emphasize and outline what your course participants will gain from purchasing and taking your course.
- Imagery – Images that brand your course without distracting from the words. Imagery needs to support the message, not be the message.
The headline is most important.
Next important?
Your copy!
Writing sales page copy might just be the hardest part of creating a course and selling it.
I can’t encourage you enough to go through the free how to write six-figure sales pages for courses lesson, provided by Thinkific.
It’s lesson three of their free Amplify training you can get access to by clicking here.
Publish … and Start Making Sales
Once you have …
- Finished the outline for your course,
- Uploaded your first lessons,
- And created your awesome sales page …
You are ready to start selling your course!
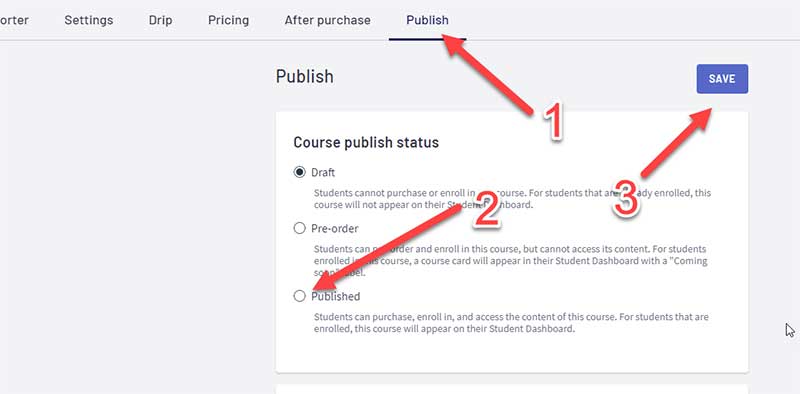
To do this, click on the Publish tab at the top of the page.
This will show you your completed course lineup.
It will let you take one last look at everything before you actually publish the course.
Once it all seems to be in order, click the Publish tab …
Change your course from Draft to Published.
Then hit save:
And that’s it!
With the push of a button, your course has now been published!
To share your online course, go to the Thinkific Dashboard.
Click on Settings, then scroll down to get your Site URL.
All you need to do now is share the link in all the digital places you frequent:
- Post your course on social media
- Link to it on your website(s)
- Send it to your email list
Now you have a perfectly optimized course ready to roll on Thinkific!
One Last Thing:
If you find that you need to perfect your course before you market it with some “just-in-time” learning, guess who’ll help you out?
Yup …
The fantastic folks over at Thinkific!
Their free 5-day Amplify challenge is simply unbeatable!
They’ve gotten some of the world’s leading experts to give you a crash course on how to ignite your online business and turn your info product into a money-making machine.
For free!
They will give you loads of ideas on how to improve right before you really need to push your flagship information product.
And we’re done!
Congrats on making it to the end!
You’ve learned (and hopefully implemented) our proven five-step formula to selling information products online.
Starting your own online course doesn’t have to be hard or take years to perfect.
It really is all about sharing the knowledge that will give your community the steps they need to achieve their goals.
Just remember … launch your course now!
After that, stay committed …
And pretty soon, you’ll be able to fire your boss because you’ve made it with your online courses!